
Product photography against a white background is one of the most crucial factors for online sales success. Potential customers want to see the product without being distracted by unwanted elements, and this is where the importance of a clean, white background comes into play. If you examine marketplace product photography choices, you'll see that platforms like Trendyol, Hepsiburada, and Amazon primarily accept photos with white backgrounds.
Hiring professional product photography services isn't always a good option for budget-conscious ventures, as the cost of a photo session can reach substantial amounts. If you're on a limited budget, you can try professional product photography yourself. Follow the tips and advice below to capture professional-quality photos of your products without leaving your home or office.
Required Equipment

You don't need to rent a professional studio for your product photos. You can use certain photography equipment that you can purchase even on a limited budget.
- DSLR/Mirrorless Camera : You can take photos with almost any camera. For product photography, your camera should have a manual mode and be suitable for use with a tripod.
- Tripod : Because you'll often encounter situations where you want to capture high-quality photos in low light or softer lighting, you'll often need to use long exposures. For this, you'll need a tripod.
- Lighted Tent or Soft Tent : If you have a lighted tent or lighting equipment suitable for the size of your product, you can use a soft tent.
- Lens : You can choose a standard lens that will not distort the proportions of the product. It can be a lens between 35mm and 100mm.
- Natural Light or LED Light : You can use natural light coming from a window. Remember that natural light fluctuates constantly. If you don't have a window, you can get a few lamps or a tent with lights.
As you can see, you don't need to spend a lot of money to take product photos with a white background. Besides having a good camera and lens, it's also important to use the right amount of light.
How to Get the Perfect White Background in Product Photography
If you've never taken a product photo before, you can start with a simple object without shiny surfaces. It's best to choose products with bold colors that will stand out against a white background.
Step 1: Setting Up the Light Tent

In this shoot, we'll be using the Gdx 40x40 lighted product tent. You can also use the included white, black, gray, and blue backgrounds for different shots. The easy-to-install lighted product tent's Velcro front cover allows you to remove it for better angles.
One of the key benefits of a white background in product photography is ensuring your subject is well-lit. Create infinite depth by placing your white backdrop in the rear sections of the tent. Make sure it's free of wrinkles and blemishes. The background must appear flawless.
Step 2: Adjusting the Lighting

Use your light to its fullest. The better you illuminate the product, the lower the ISO setting you can use. Additionally, you can close the aperture further for sharper images. Gdx Light Tents are manufactured with a specially reflective interior to diffuse light.
Step 3: Prepare the Object

Because high-resolution photos highlight details, fingerprints, dust, and dirt can be clearly visible on the object. When moving the object, make sure your fingerprints don't get on the product. To prevent this, wear latex gloves.

You should also clean the product with a microfiber cloth. If your product is made of glass or steel, it's best to polish it with specialized cleaning products.
Step 4: Positioning the Camera
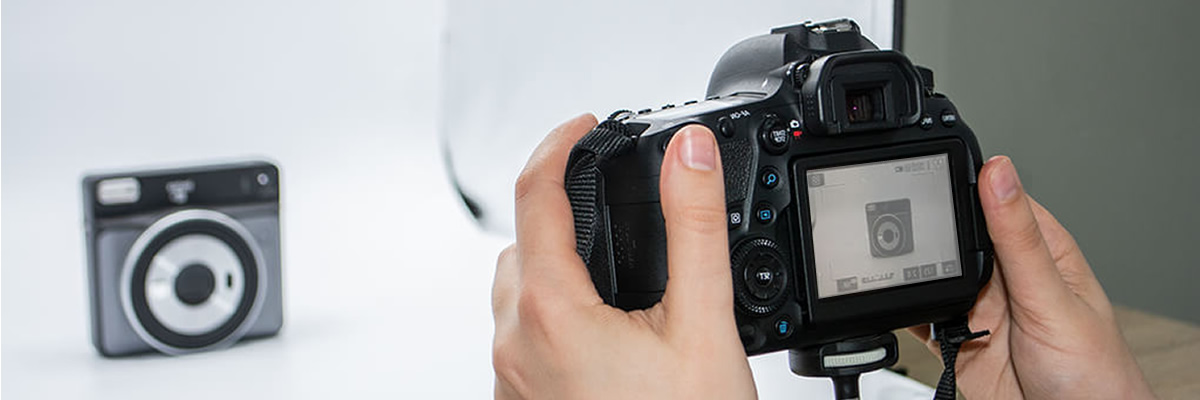
The Gdx 472 Tripod is a convenient way to position and hold your camera steady. You can use books or a chair instead. Position your camera facing your subject and avoid placing it too close.
Step 5: Camera Settings

Below are suggested standard settings that are commonly used.
ISO:100
Shutter Speed: 1/4
Aperture Setting: f/14
Image Format: RAW
If your subject is very dark or lacks sufficient light, you can try an ISO between 200 and 400. Increasing the ISO can create unnecessary noise in the photo. Aperture directly affects the sharpness of the image.
If the F-number is high, you can easily see details in the photo. If you don't want the image to be too dark, it's better to take the photo with a slow shutter speed.
Step 6: Start Taking Photos

Once everything is ready, we can start pressing the shutter. If your camera has a sensor display or remote control, it's a good idea to use them.
If you're shooting handheld, slow shutter speeds will cause your photos to come out blurry.
You can use RAW format to make editing products easier later. This allows you to highlight the dark and light areas of your images in more detail.
Step 7: Editing Photos

Taking photos means dedicating your time to the task at hand. You can make small adjustments to your photos with photo editing software. You can adjust the white balance and shadows of your photos to perfectly whiten the background. If you notice any imperfections on your product or the background, you can use Photoshop's healing and stamping tools. The first priority is capturing the best white background for product photos. The second is editing the photo with software.
SHARE:
Continuous Light or Flash Light? Which Should I Use?
A Complete Guide to RGB Lights